17. Firewall configuration
DynFi Manager stores all firewall configurations since the device was first connected. The list of configs is presented by Configs widget on device details page. The widget is an entry point to various operations on configs, like examining the content of the config, comparing given config to another one or restoring given config on a remote device.

The list of all collected configs is also available on Firewall configs page (⚙️ -> Firewall configs).
17.1. Comparing configs
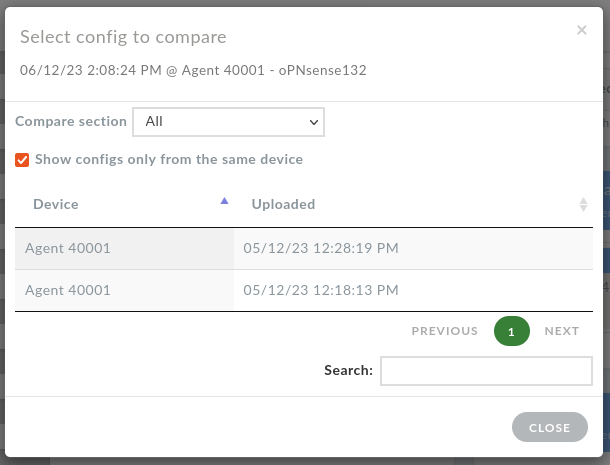
Use Compare button on Configs widget or Config details and choose the other config in modal window.
By default, modal presents only configs from the same device. Uncheck “Show configs only from the same device” to be able to choose configs from other devices.
It’s also possible to compare only a particular section of a config, see Compare section dropdown.

- Comparison page consists of three columns:
first selected config
diff
second selected config
By clicking on the columns, one can see the full content of each selected config and the diff - lines added/removed in the config on the right, compared to the config on the left. Plus sign (+) indicates that the right config has added a line, minus (-) indicates that a line has been removed.

17.2. Restoring configs
Warning
This is an advanced feature. Please, make sure you read this documentation carefuly, especially if you would like to restore a config on another device. It is adviced to first explore and learn this feature in test environment, before applying changes to actual firewalls.
A config can be restored (uploaded) on the same or another device. The entry point of this operation is Config details page, with two buttons - “Restore on this device” and “Restore on another device”, which lead to Config restore page.

Config restore page constists of a familiar comparison widget and restore status widget. Left column of the comparison widget shows the config present on the device, right column - config to be restored. In the middle there’s a diff of two configs. After applying the changes, observe status widget - it presents current state of the operation, with exact commands run on the firewall on the right. The entire operation is logged and available in Manager logs, with detailed list of performed commands.
Warning
Please, verify the diff of the two configs very carefully. The config to be restored may contain crucial device-specific changes, like IPs, hostnames, plugin versions or auth keys. A mistake here may lead to making your firewall inoperable and forcing a manual restore from backup. See Expert mode to learn how to edit parts of the config.
Note
DynfiManager will not allow restoring incompatible configs, e.g. OPNsense config to pfSense firewall or newer version of the config to older firewall version. A config with no changes compared to the one present on the device will also not be restored.
17.3. Restoring configs - expert mode
Comparison widget can be used in Expert (or edit) mode. This mode allows editing the config to be restored according to your needs. In expert mode the logic of the widget changes a bit. Left column still presents the config currently used by the device. Right column shows restore candidate - a config initally selected to restore on the device. The middle column becomes an area where the final config to be restored is edited, with preview available. So, in this mode, the middle column, withe Preview enabled, indicates the exact final config to be restored, not the right column.
17.3.1. Editor
Initially, editor shows the diff of configs presented in the left and right columns. Contrary to basic mode, the entire config is visible, not only the parts which differ. The content can be edited according to your needs.

Please, note that if you edit a line marked with plus/minus sign, you should also remove the sign from the beginning. You don’t have to edit all lines marked with +/-, each plus-marked line will be kept, each minus-marked will be removed, there’s no need to edit the entire document.
Lines marked with +++, ===, @@ will also be finally removed - they’re only present for the needs of diff.
While editing you can use common keyboard shortcuts known from other editors, like ctrl+Z, ctrl+Y, etc. You can switch between columns without loosing changes in the editor, but switching the expert mode off will reset the changes.
Finally, to see the result, turn on the Preview mode. This mode shows the exact content of the config to be restored on the device.

Note
Although the expert mode is intended to fix small changes between restored config and the current one, it is in fact a tool which allows live-editing current config. This kind of usage is discouraged, as it’s very error prone.
17.3.2. Restoring the edited config
When the config is edited, restore status widget indicates this fact in “Config version after restore” field, e.g. “OPNsense: 23.7.4 (edited)”. It’s important, because editor allows to change the entire config, so in extreme cases it might have nothing in common with the initial version. Version “OPNsense: 23.7.4 (edited)” means that initial config comes from this version, but DynFi Manager cannot guarantee that final content doesn’t have errors or changes incompatible with current firewall version - it’s under the responsibility of the person who edited the config.
After uploading an edited config (in fact, every config) to the device, DynFi Manager fetches the new config from the device. The version of this config is the current one read from the device. It’s adviced to make sure that newly fetched config is really the one which was uploaded (using compare configs feature). Firewalls have the machanisms to protect against incorrect configs, so e.g. if you tried to upload a config with an error it might be refused by the firewall. Unfortunately, it’s not indicated in restore status - firewall may silently fall back to a previous config. To avoid confusion, always make sure that the last config fetched from the device is really the one you planned to restore.
17.4. Removing old configs from DynFi Manager
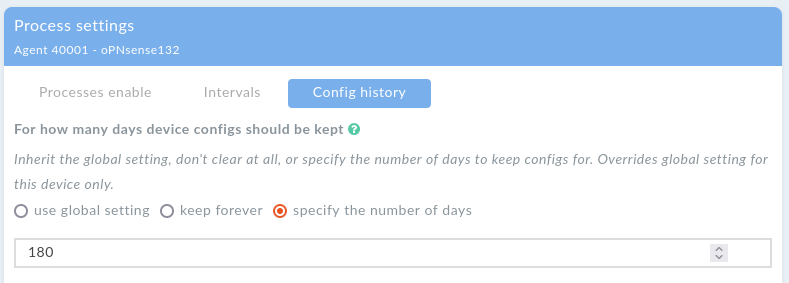
By default DynFi Manager keeps all configs fetched from the devices. This behaviour can be adjusted on both global and device level.
To specify the number of days all device configs should be kept, go to Config history in Device default settings (⚙️ -> Device defaults-> Config history tab).

This default setting can be overriden by device-specific one in <Your device>-> Settings-> Process settings-> Config history.

In both cases, eligible configs will be deleted immediately after the settings are submitted, and twice a day thereafter.