16. Managing aliases with DFM
One of the DynFi® Manager’s features is managing aliases of attached devices.
Aliases are powerful tool to ease and improve firewall rules management. In short, instead of creating FW rules many times for each IP separately and then updating all these rules when the IP changes, an alias for one or many IPs can be created and then used in FW rules. This way when something changes, only one alias has to be altered once. Aliases also allow specifying ports, networks, various URL-based list, etc. For explanation about the concept of aliases, please refer to manual of your chosen solution: OPNsense® alias manual or pfSense® alias manual
16.1. Editing aliases of a single device
To edit aliases of a single device, navigate to the device. Then, in the left menu, select Aliases. In the screen that opens you are able to (among other things):
browse and search the aliases,
create new aliases,
modify or delete existing aliases.
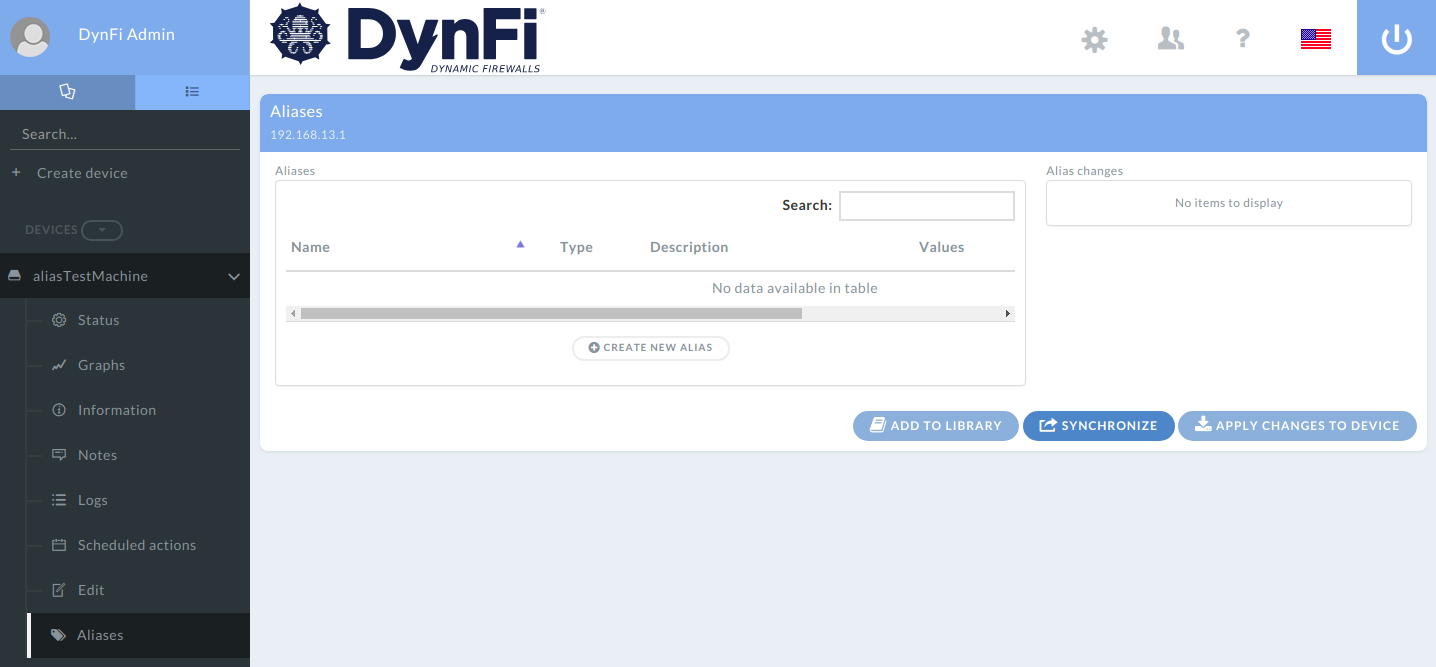
Aliases configuration screen for a device with no aliases defined
When trying manipulate aliases of a device, DynFi Manager will do its best to prevent doing changes which may corrupt the setup of the device. E.g. it is impossible to add an alias if another alias with such name already exists, or to remove an alias if it is used in other aliases or firewall rules.
Unlike your system of choice (OPNsense or pfSense), DynFi Manager does not and cannot perform the changes directly in the device, because it is DynFi Manager’s web user interface (not direct device’s web user interface) used. Therefore:
based on latest config backup DynFi Manager shows the aliases,
allows specifying various alias changes for the device,
the changes are added to the list displayed under Alias changes
DynFi Manager tries to perform the specified actions after clicking [Apply changes to device] button.
Note
DynFi Manager reads aliases not directly from the devices, but from the most recent config backup in DynFi Manager.
Note
No changes to aliases will be made if [Apply changes to device] is not clicked
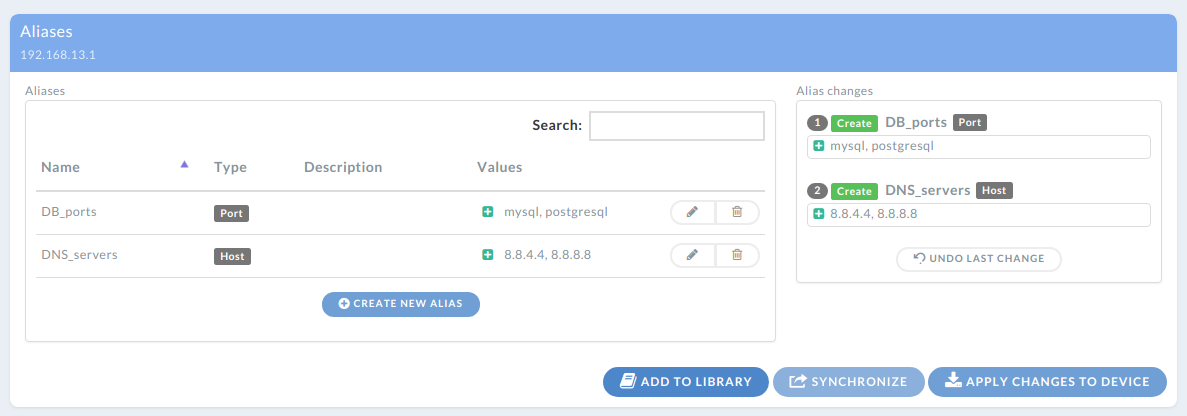
Aliases widget with specified Alias changes just before clicking [Apply changes to device]
After clicking [Apply changes to Device] DynFi Manager will try to apply the recorded changes as soon as possible. The progress of the requested Alias changes can be traced in DynFi Manager’s web interface.
The Alias changes will not be performed, if:
alias changes are disabled either globally or for the given device
the device cannot be reached by DynFi Manager (i.e. from DynFi Manager’s perspective the device is offline)
It is advised not to change aliases or firewall rules directly in the device (using its web user interface) when changes are supposed to be done by DynFi Manager as well. In case DynFi Manager detects that some changes were made to the device which render the requested Alias changes not applicable, then the whole Alias update will be aborted and marked as Not Applicable.
Note
When editing aliases using DynFi Manager, please do not do that manually in the device. This will make the requested Alias update break and marked as Not Applicable in case of any conflicts.
Note
DynFi Manager either performs all requested Alias changes or none. (“All or nothing.”) DynFi Manager will not apply only some of requested Alias changes specified in the Alias update.
DynFi Manager tries to apply the changes specified by the user in the order they were specified. Current status of Alias update can be examined using Alias Updates screen. If something fails (which means DynFi Manager will abandon all changes according to “all or nothing” principle), DynFi Manager will try to give the best possible feedback about the reason.
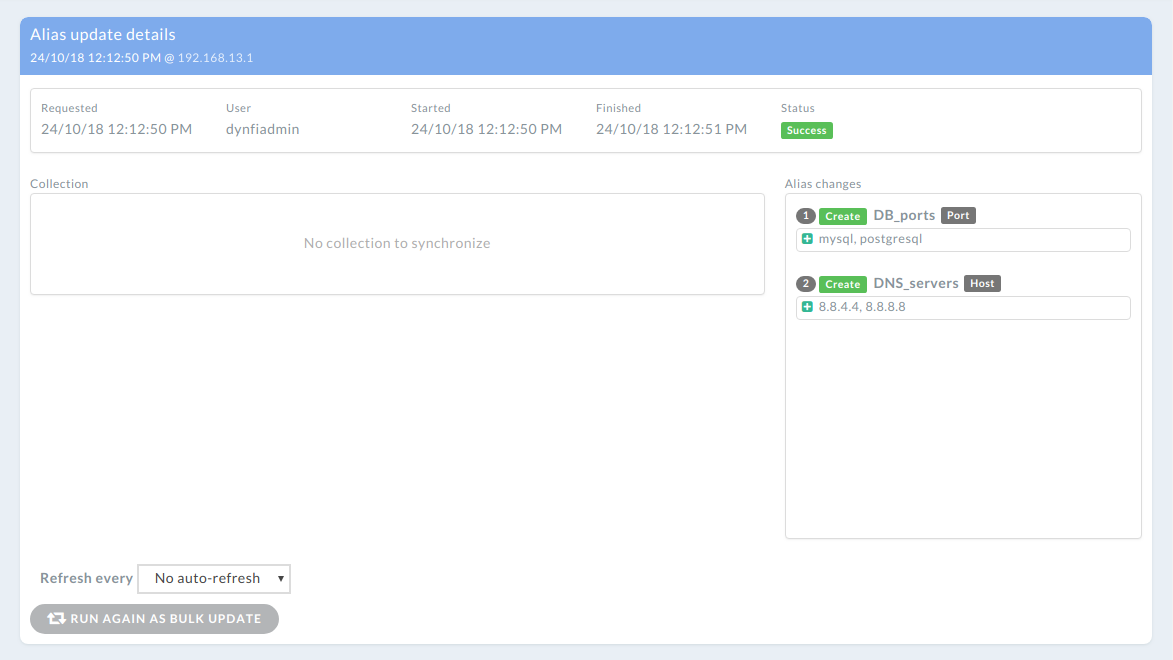
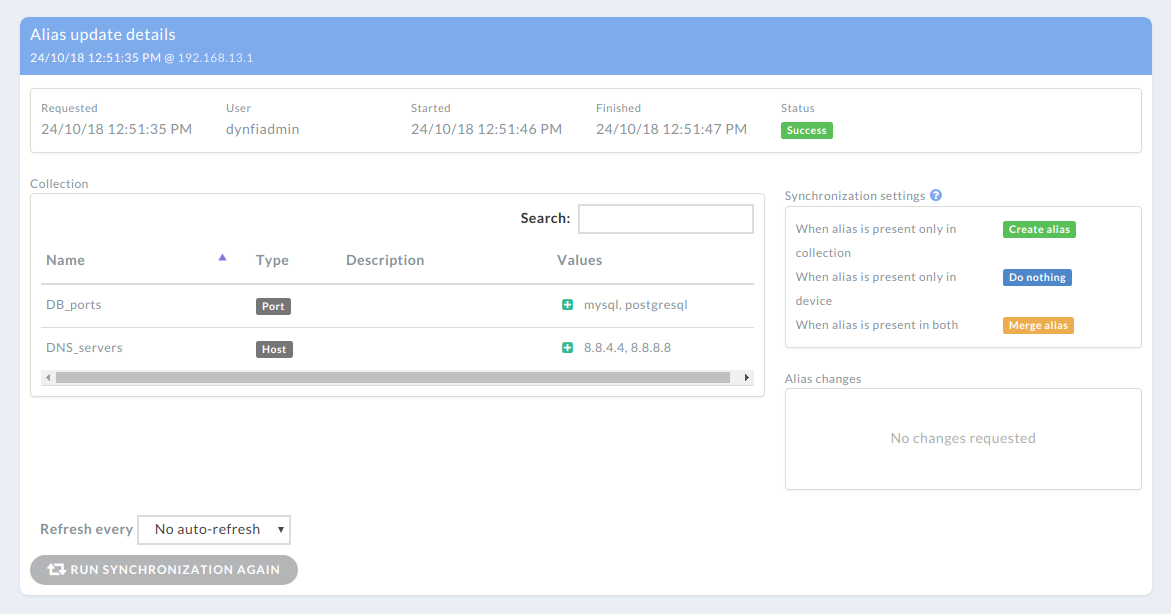
DynFi Manager reporting successful aliases update for a single device
16.2. Editing aliases of many devices
Performing changes to aliases in a device-by-device fashion can be a tedious and error prone task. Therefore DynFi Manager allows performing bulk/batch Alias updates. This way Alias changes defined once can be applied to many devices, there’s no need to record the changes from scratch each time.
There are two ways of preparing bulk Alias update.
One way is to enter details screen of any Alias update, click [Run again as bulk update]: this will pre-initialise the screen with the actions specified already and will also pre-select the device for which this very update was specified.
Another way is to click [Run bulk alias update] in the Alias update overview/list screen and compose the Alias changes manually.
In both cases the user can:
choose any number and set of devices to apply the Alias changes in the top right corner and select one of them to show preview,
tune the list of actions to be performed.
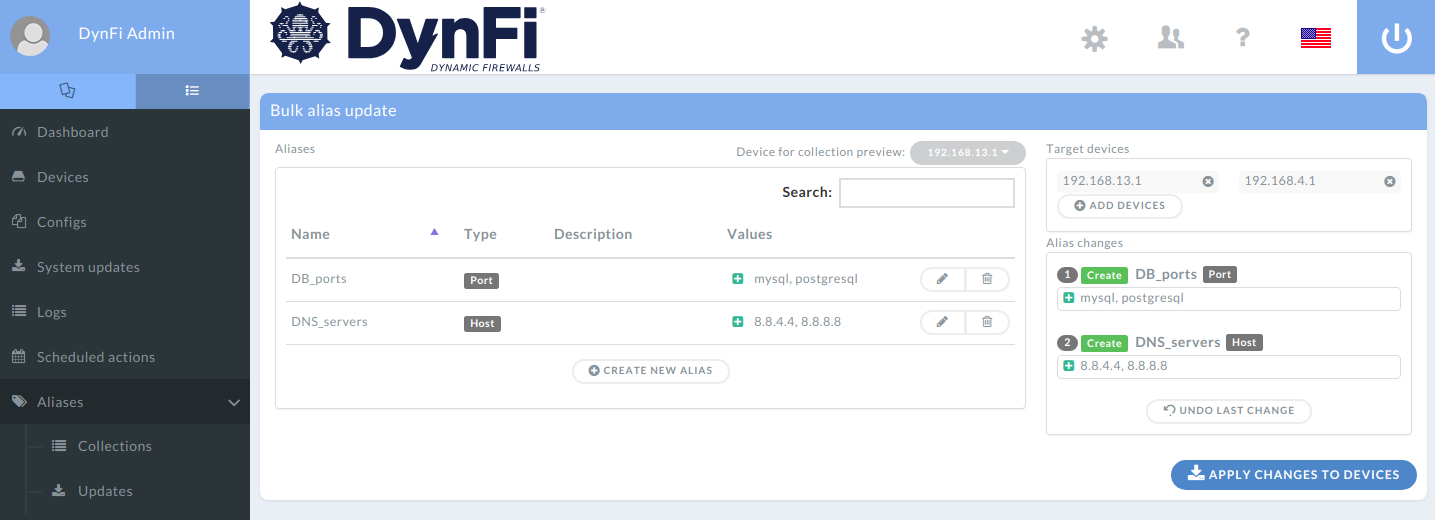
Specifying bulk alias update for many devices
After clicking [Apply changes to devices] DynFi Manager will record a request to perform as many individual Alias updates as selected devices. Each device’s Alias update is independent from the other updates: the updates can fail or succeed independently, the order is not granted. This works just as if the user requested exactly the same Alias update for each device one-by-one from scratch. The difference is that this does not have to be done, DynFi Manager will start all Alias updates on its own. E.g. if the user selects to delete alias “XXX” and add alias “YYY” to devices AA, BB and CC, then DynFi Manager will create three individual Alias updates (because there were three devices selected), in each Alias update trying to delete alias “XXX” and add alias “YYY”.
Note
For each device DynFi Manager starts individual and totally independent Alias update, despite starting all of them together in bulk mode.
16.3. Alias Library and Alias Collections
Specifying manually explicit actions which should be performed to devices’ aliases allows fine-grain control, but oftentimes can be a tedious task. Managing tens of devices can easily make this difficult, especially for environments in which each device differs significantly from the others and all of them require some sort of initial cleaning to improve the quality of the aliases and firewall rules in the organisation. This is because Alias changes specify what shall be done to aliases, not what the aliases should be. The answer to that are Alias synchronisations (described below), which require familiarising with the concept of Alias Library consisting of Alias Collections first.
16.3.1. Alias Collection
To ease handling aliases across many devices in the network and keep them in the same state, DynFI introduces the concept of Alis Collections.
Alias Collection is any number of aliases, which exist together and can also depend one from another. All aliases in an Alias Collection must be correct, i.e. no obvious bugs or inconsistencies are allowed.
All aliases defined in a device at given moment are Alias Collection, living de facto in the scope of this very device.
An Alias Collection
can be created from scratch in DynFi Manager,
can be imported from any attached device,
can be imported from aliases or config backup files (aliases.xml or config.xml) created from devices not attached to DynFi Manager
can be imported and exported using DynFi Manager’s format (very useful for sharing one’s collection with other people)
can be edited/tuned/managed after importing or creating directly in DynFi Manager, not in a device
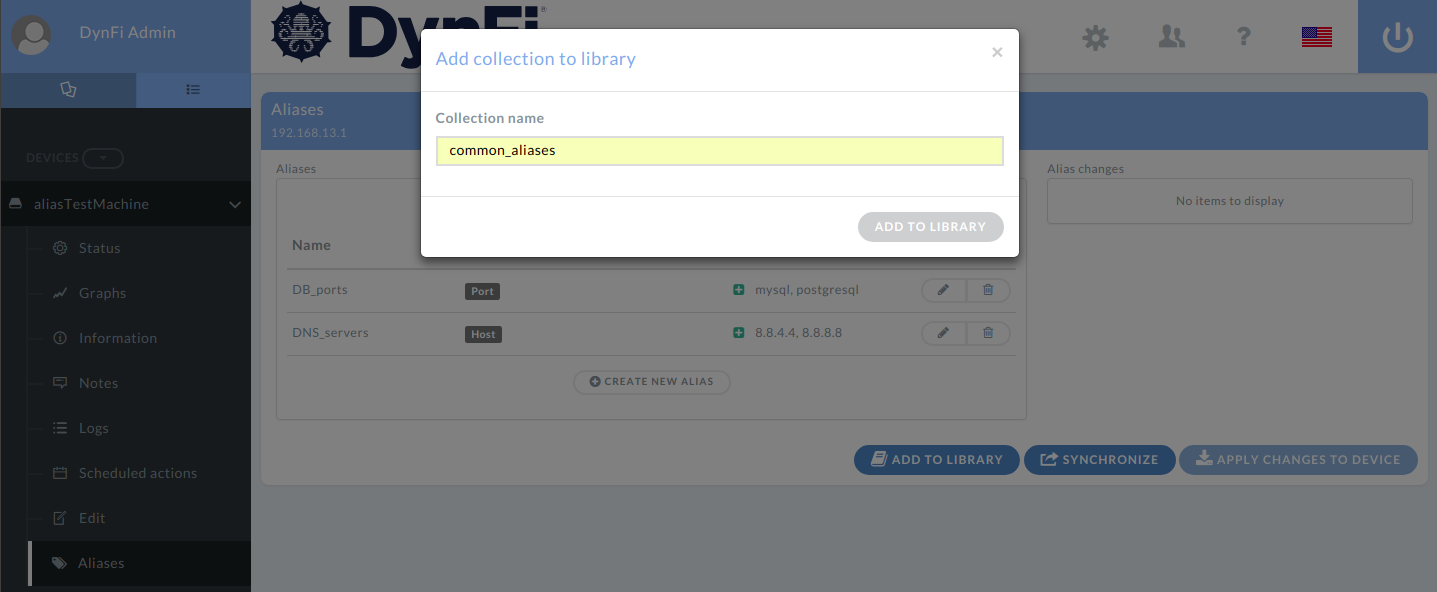
Adding aliases from a device as Alias Collection to the Alias Library
16.3.2. Alias Library
Each DynFi Manager user has its own Alias Library for keeping their own Alias Collections. The Alias Library is the place when the user can browse, import/export and manipulate the Alias Collections. One of the key features is the possibility of managing an Alias Collection directly in DynFi Manager, not using a real device, to craft an Alias Collection. Of course, this is less restrictive compared to real devices (and should be used with care), because aliases in the Alias Library are “standalone” or “detached” from all devices. E.g. it is impossible to check if an alias is used in a FW rule or has a name overlapping existing interface if the Alias Collection is not “living” on any device.
16.4. Alias synchronization
Alias synchronization is the most advanced feature of alias management in DynFi Manager. It allows keeping aliases across many devices up to date without need to manually update devices one by one.
The difference between Alias Update and Alias Synchronization is that whereas an update is focusing on individual actions (like “add alias XXX”, “delete alias YYY”), a synchronization is focusing on the final state (like after the synchronization the device must “have alias XXX” and “don’t have alias YYY”.)
Note
Alias Synchronization is about what aliases should be present in the device after the synchronization is complete.
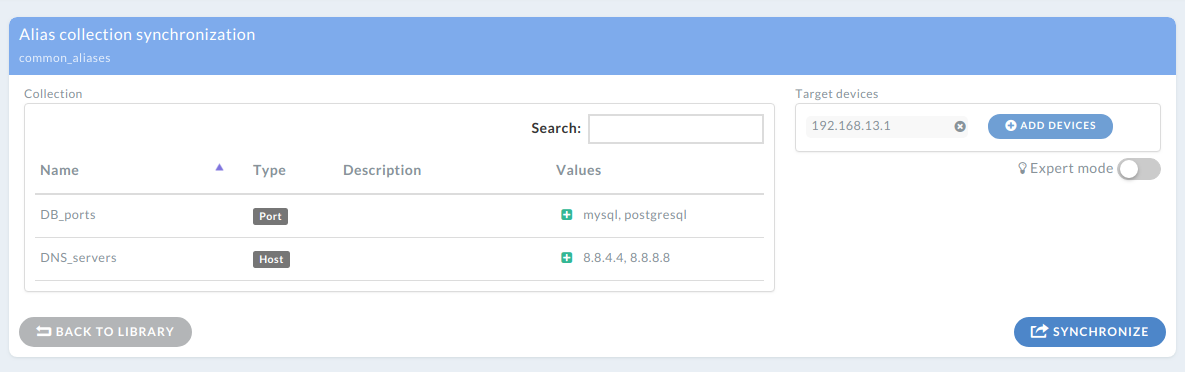
Alias synchronization requires:
Alias Collection to synchronize with (can be “anonymous” from any managed device or can one stored in Alias Library),
devices to synchronize (at lest one),
synchronization options, default or customized (in expert mode),
(optional) initial/pre-synchronization options
To start a synchronization, the user has to select any Alias Collection (from the Alias Library or managed device), click Synchronize button, select the devices which should be synchronized (optionally tune the options) and then confirm the synchronization.
This will trigger as many synchronizations as devices selected. I.e. DynFi Manager will attempt to synchronize each device in an independent way. E.g. when trying to synchronize 3 devices with a collection, the result are three synchronization operations, each can be successful or not. (Just like bulk updates.)
The synchronization operation is “all or nothing”: either the synchronization can be conducted in 100% successful way, without any conflicts and the aliases in the devices will be changed/updated, or it will be interrupted/abandoned and the aliases of a device won’t be modified in any way. (Just like for bulk updates.)
When the synchronization is started, the source/master collection is being copied and cannot be modified during the synchronization. It means that
if Alias Collection ACX was used to synchronize with some devices
and the Alias Collection ACX was modified after the synchronization has been requested
the changes applied to the Alias Collection ACX will not be applied automatically to the devices.
After tuning the collection it has to be synchronized again if that’s needed.
Note
After using an Alias Collection for synchronization it is not linked with synchronized devices in any permanent way. If some changes to an Alias Collection should be propagated to devices again, this requires new Alias Synchronization, because synchronization work on snapshots of Alias Collections (current state at the moment of requesting the synchronization).
Specifying Alias Synchronization with default options
16.5. Synchronization options
For better control and more sophisticated scenarios DynFi Manager allows specifying how the alias synchronization should work. In default mode DynFi Manager:
adds all aliases which exist in selected source collection and do not exist in the device,
does not change/delete aliases which exist in the device but do not exist in the selected source collection,
stops with an error if the same alias name is used in both device’s and source collection.
These settings can be controlled in the Synchronization Options after enabling Expert Options.
When alias in present in collection but not in device
“Create alias in device” will try to add the alias and fail if impossible.
“Do nothing” will skip such alias.
“Report error” will break the synchronization and report an error. This can be useful when it is expected that the device should not have any aliases defined in the collection.
When alias is present in device but not in collection
“Do nothing” will skip such alias and leave it as it is.
“Delete alias from device” will try to delete such alias and fail if impossible (e.g. alias used by another alias or in a FW rule)
“Delete alias from device if not used” will try to delete such alias only if it is not used by another alias or in a FW rule for example. This option is especially useful in conjunction with an empty Alias Collection to prune all aliases not used anywhere.
“Report error” will break the synchronization and report an error. This can be useful when it is expected that the device should not have any aliases not defined in the collection.
When alias is present in both device and collection
“Report error” will break the synchronization and report an error. This can be useful when it is expected that no alias should exist the same time in the device and in the collection.
“Replace alias in device with the one from collection” will try to replace all addresses/URLs (and other fields) in the device using values available in the collection.
“Merge alias in device with the one from collection” will try to identify all addresses/URLs present in the given alias in the collection but missing in the alias in the device. In such case the “extra” addresses/URLs from the collection will be appended to the device
“Do nothing” will skip such alias and leave it as it is.
16.6. Solving conflicts and initial actions list
It might happen that an alias synchronization will fail due to some conflict(s). E.g. someone may wish to add an alias and the name of the alias can already be used. In such case DynFi Manager will abort the synchronization for such device and will try to mark the conflicting alias(es).
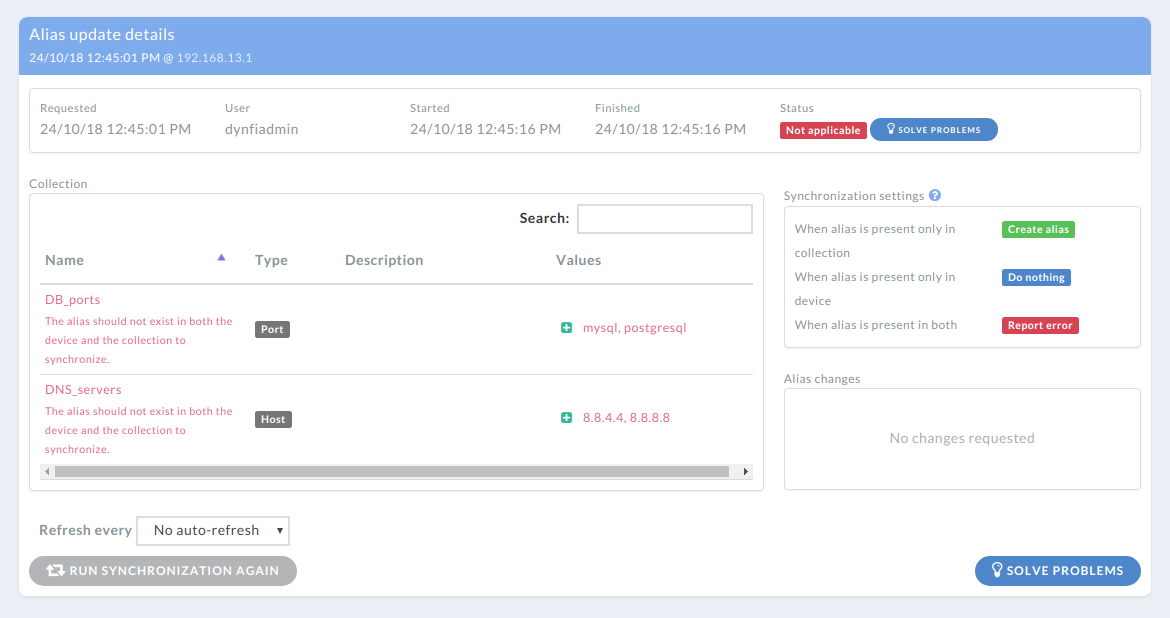
An example of Alias Synchronization failed due to some conflicts
It will give the user a chance to add some extra initial actions which will take place before the actual synchronization.
To do so, in the synchronization which is “Not applicable”, the user should click [Solve problems] button, and in the next screen define some actions which will bring the device’s aliases into a state which does not cause any conflicts during the following synchronization. E.g. this can be renaming the alias or removing the alias, so the name is free to be added.
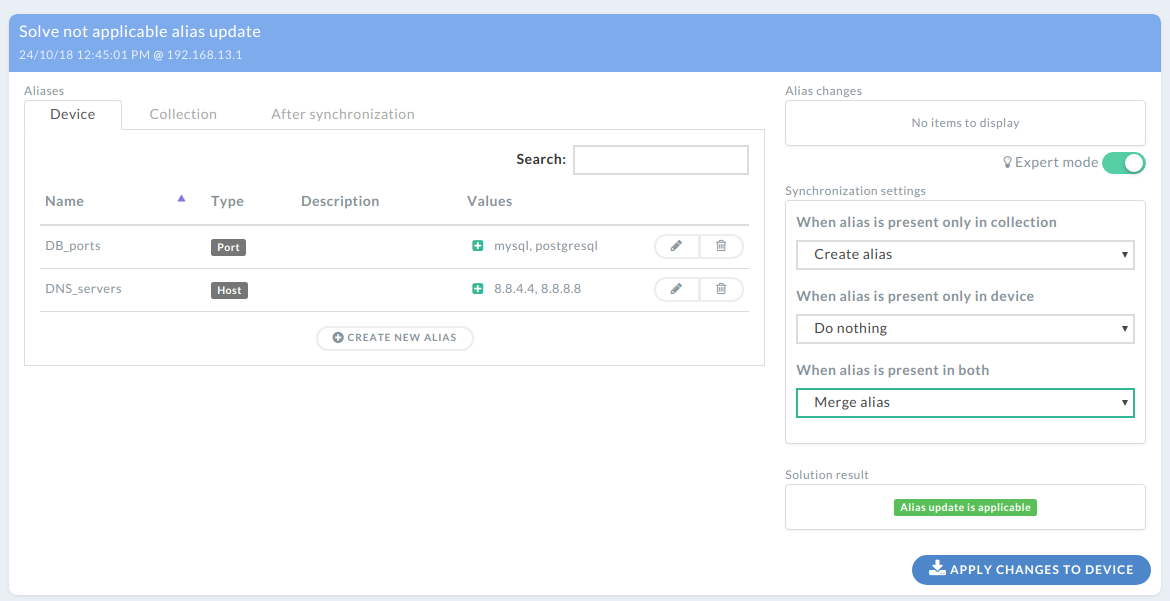
Conflict resolution screen with expert mode options enabled
The initial changes list will be applied to the device’s aliases before the actual synchronization just as if the user visited the device themselves and cleaned it in a necessary way. The only difference is that the “all or nothing” rule applies here as well, so the initial changes AND the following synchronization must work 100% together and leave the aliases of the device in correct and consistent state. Else, such synchronization will be aborted and will not change any aliases on the device.
It might happen that after resolving a conflict (by changing synchronization options or specifying some pre-synchronization actions in initial changes list) and starting new synchronization another conflict will be detected. This is caused by the nature of the synchronization: after detecting a conflict, it is often impossible to predict other (possible ones), just like in chess. Changing one move can change totally the rest of the play.
An example of successful Alias Synchronization after solving conflict(s)